Headed punches ISO with ejector PB-PPEB / PB-PPE_ - ISO 8020
Headed punches ISO with ejector PB-PPEB / PB-PPE_ - ISO 8020
The P_-PPE_ headed precision punche is easy to install and has a good head resistance. The ejector facilitates waste removal. Headed punches are mounted in a tool to cut, bend or form sheet We are machining our punches following your needs or drawing. They are also available as blank.

Specifications
Material : Material B : High-speed steel HSS / 1.3343 / M2 / HS 6.5.2 / Z90
Standard : ISO 8020 / NF E63-101
Dimensions :
- Diameter : from 4mm to 40mm
- Length : from 71mm to 120mm
Cylindrical head, 5mm thick.
Available shapes : Available as a blank or following our 6 standards catalog shapes. Others shapes can be made as special.
Coating : Standard coating : TIN, Alcrona (AlCrN), TICN, CrN, t-ac.
Other coating on request.
Hardness:
- Head 47 -57 HRc
- Body 60 - 64 HRc
Benefits :
- Easy to install using the counterbore. The head is chamfered to ensure correct perpendicular alignment with the punch holder.
- Very precize orientation flat.
- Tight tolerance on the head thickness ensuring that the run out is reduced, resulting in less clearance and a greater head stregth.
- All our punches are engraved to your specifications for quick identification.
- Ejector for waste removal
Tolerances :
- Body tolerance m5
- Length tolerance +1/0
- Cylindrical head thickness tolerance +0,1/0
- Cylindrical head diameter tolerance 0/-0,25
- Shape tolerance ± 0,01
Conception :
- The cylindrical head is hot forged for a better strength and durability.
- The body and shape are grinded with high precision.
Target application
Ideal for press tools or injection moulds.
Recommandation d'utilisation :
- Mounting : The headed precision punch is mounted in a punch retainers with counterbore.
- Cutting clearance : We recommand a cutting clearance between the die button and the punch corresponding to 10% of the thickness of the sheet being cut. (except special applications)
Maintenance recommendations :
- Regular cleaning
- Regular inspection
- Checking alignment with the die
- Regular lubrication
To order you need to indicate :
- The desired dimensions
- Desired shape (except for blanks)
- Shape dimensions (except for blanks)
- The desired coating
- Shape orientation
- Standard alterations
Example : PB-PPEL-25-71-20-P24-W12,5-R2T0-TIN
Technical data
3D Model
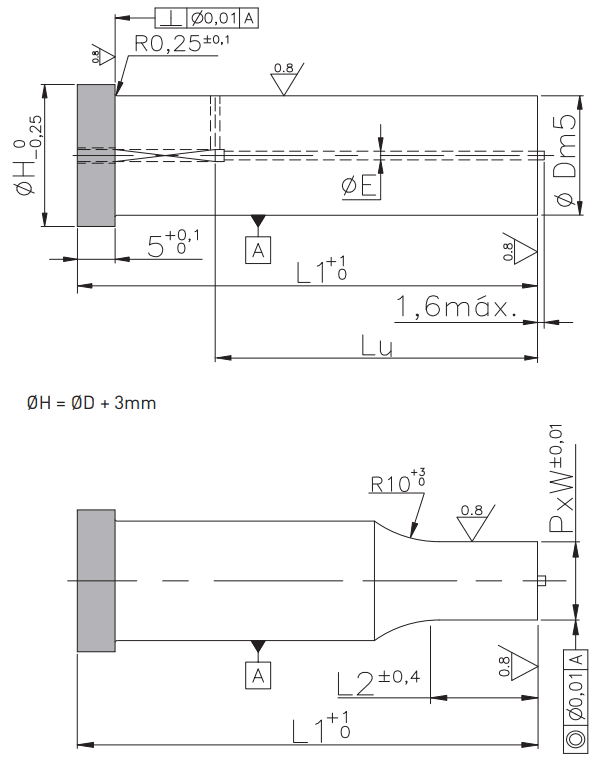
Plan
L : Punch length
Dm5 : Body diameter tolerance m5
H : Cylindrical head diameter
L2 : Working length for shaped punches
P x W : Shape dimensions
Lu : Useful length
E : Ejector diameter


